Lost Temple: Creating a Scene with Blender and Megascans Assets
Introduction
Hi! My name is Andrii Stadnyk, and I’m a concept artist at Room 8 Studio, where I create various types of concept art, from props and asset designs to concepts of locations, game levels, and mood exploration.
My career as an artist in the game development industry began nine years ago when I got a 2D artist job. I started with UI assets for casual games and later decided to develop my passion for creating concept art further. Before switching to the game development industry, I gained some experience working as a graphic designer, and this experience helped me in my current work.
About the Project
“Lost Temple” is a personal project where I experimented with a few things – Quixel Megascans, image projector technique, paint over for a “painterly” look, and complex scatter in Blender. I had an idea of an artwork depicting some forgotten ancient temple, so it instantly came to my mind when I explored Megascans assets in Quixel Bridge. Having such a variety of Megascans assets available, I challenged myself to create an artwork mainly using 3D Megascans assets. As a result, I wanted to get a “painterly” look for the artwork, so I moved to Photoshop after adjusting everything in 3D.
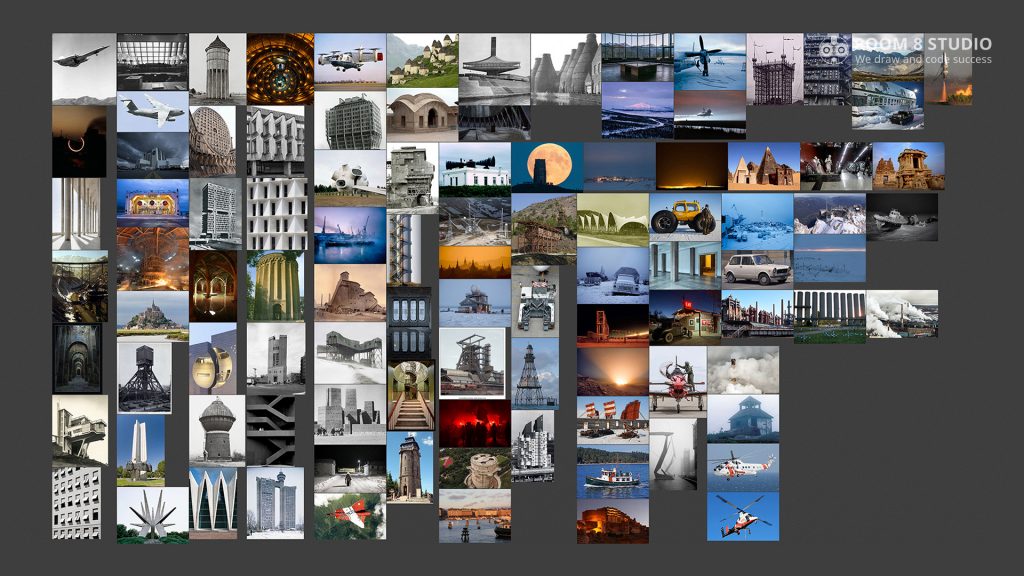
I didn’t gather reference images for this project on purpose, but I always collect compelling images on the internet. Browsing these images collection could spark an idea for a new project or help with current. Also, artworks from favorite artists like Sparth, Eytan Zana, Florent Lebrun, and others are a great source of inspiration for me.
The main tools for this project were Blender, Quixel Bridge with Megascans, OctaneRender, and Photoshop.
Choosing Blender
My journey with Blender started a few years ago when I worked as a 2D artist, primarily with 2D assets, and decided to add a 3D workflow to my day-to-day tasks. Before that, I had some experience working with 3ds Max and ZBrush, but at that time, 3D art was more like a hobby for me. Blender wasn’t popular back in the days, and I decided to try it just out of curiosity. It was a 2.79 version of Blender, and to be honest, my experience working with it wasn’t great, so I put Blender aside for some time. My interest in Blender significantly increased with the release of a 2.80 version. It was a game-changer since it brought a fantastic real-time Eevee renderer, a UI overhaul, and a more streamlined workflow.
Blender is developing by leaps and bounds these days, and sometimes it’s hard to keep track of all the new features and improvements. I follow Blender.Today account on Twitter to keep up with all Blender news. Also, Pablo Dobarro on Twitter is worth following. He’s developing excellent sculpt tools for Blender and shares insights into the development.
Speaking of new features, the upcoming Blender 2.83 release will bring new sculpting tools, such as the Cloth Brush, the Sharpen Mesh Filter, Face Sets, and lots more. The new Undo system’s most long-awaited feature works much faster than Undo in 2.82. Currently, in 2.82, Undo action in a large scene could take up to one minute or even more.
Start of the Project
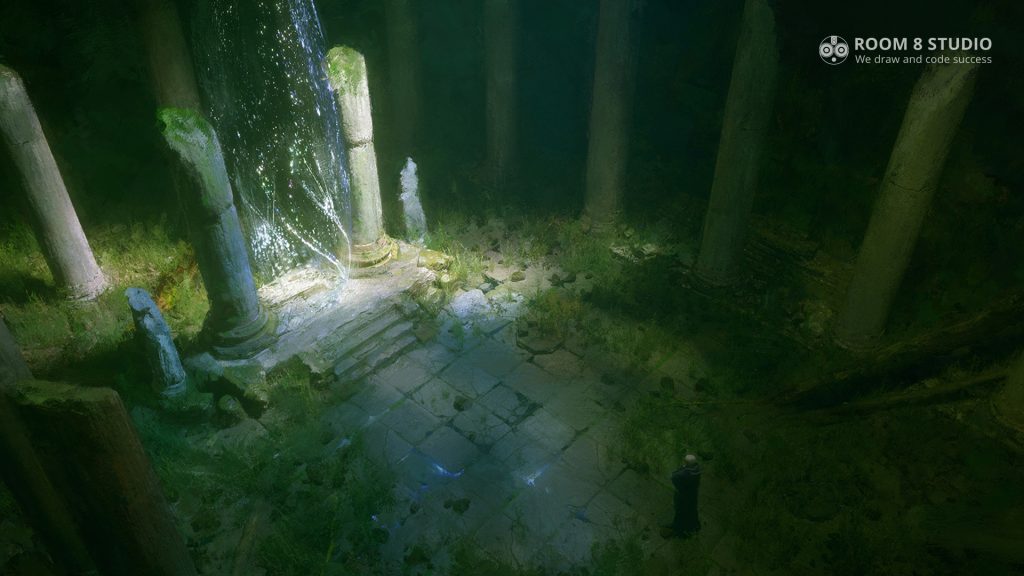
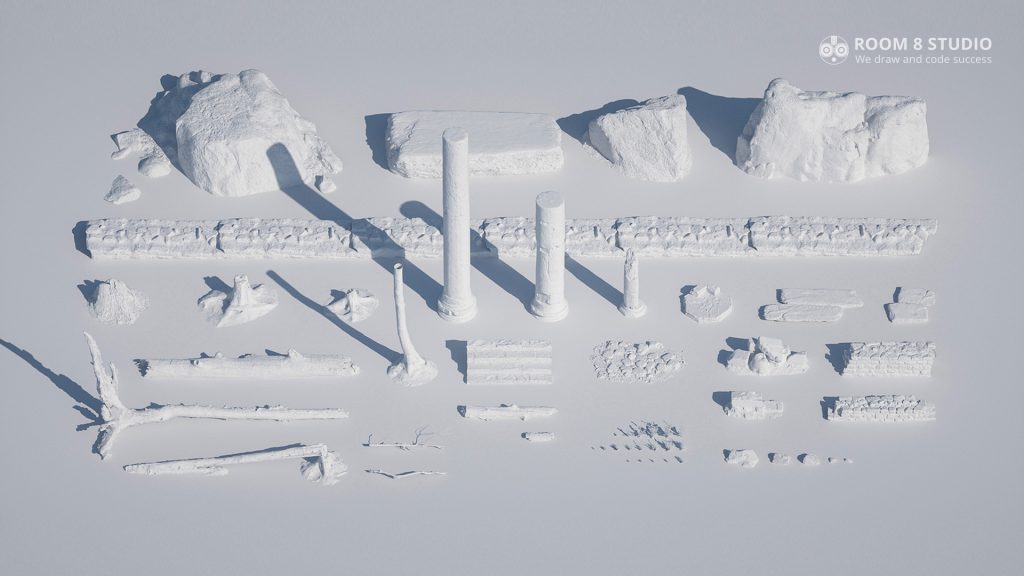
I started with creating a simple “blockout” in Blender to establish the scale of the scene. I made a simple plane, put a character from the 3D Scan Store, and added Roman columns from Megascans. In the beginning, I created a columns array with an Array modifier but later changed it to instances (Alt + D shortcut in Blender). Instanced geometry consumes less memory than geometry with an Array modifier. Columns’ size and quantity went through a few iterations until I was satisfied with the scale of the temple. Then I imported large stones, two additional columns, and castle steps to create a “portal,” which would be the main focal point.
Camera Choice
It was crucial to set up the camera position before adding other assets because the camera position defines how many assets will be visible. I tried a few camera angles and lenses and came up with a top-down position with wide-angle lenses. This helps capture the entire location and the massive size of the temple.
Adding Megascans to Blender
Since the outcome of this project is a 2D image painted over in Photoshop, I set export parameters in Quixel Bridge to a 2K texture size. This texture size is pretty enough for an image rendered as a base for painting over. Also, 2K textures use a reasonable amount of GPU memory, so using this texture size allowed me to add more 3D assets to a scene, such as grass, small branches, and rocks.
Quixel Bridge comes with the Megascans add-on for Blender, it allows you to import assets with one click, but it works only with Eevee and Cycles materials. I used OctaneRender for this project, and there are two ways to get Octane-ready assets in Blender. You can import Megascans assets in Cycles and convert Cycles materials using built-in Octane’s material converter. But for large amounts of assets, it could be tedious to do it manually, so I recommend getting the MSLiveLink Octane add-on for Blender. It does the same job as the official Megascans add-on but automatically creates required Octane shaders. It’s also free and frequently updated.
Populating the scene
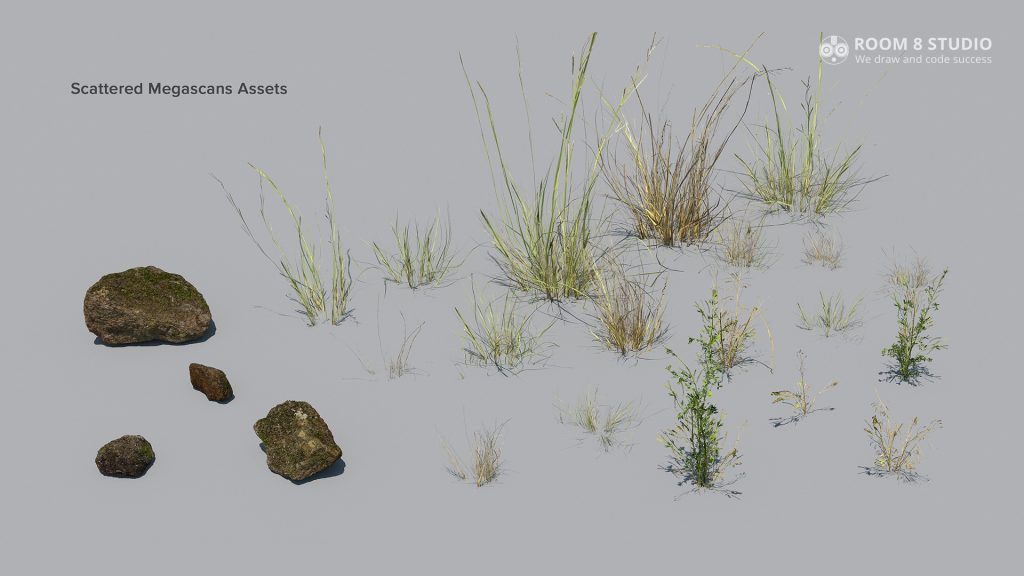
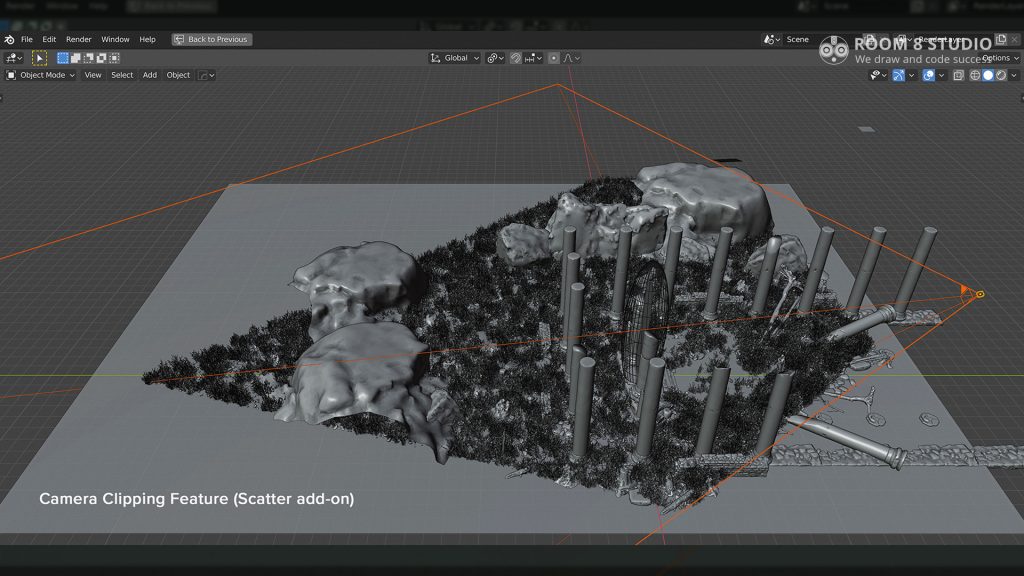
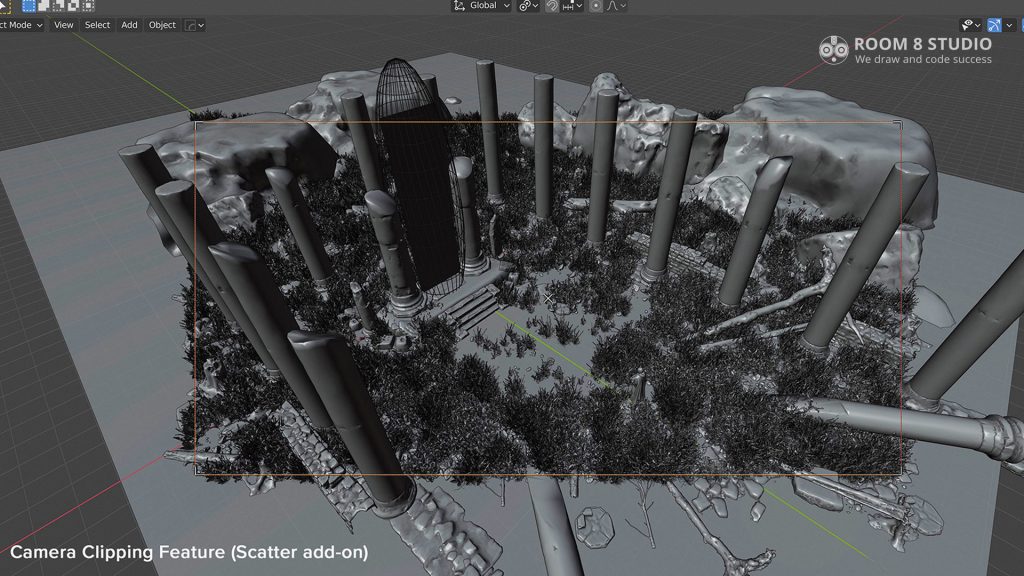
I used a Scatter add-on to populate the scene with plants and rocks. I found some nice-looking grass clumps and small stones in the Megascans library and fed them into the Scatter add-on. The tricky part here was setting up the density of the grass as it could freeze Blender completely. The Scatter add-on can set the percent of displayed particles in the viewport, and the camera clipping feature is helpful, too. But the main benefit of using this add-on is the heavy automation of particle system setup. It saves you minutes and hours of work, has ready-made scatter presets, and allows changing parameters quickly.
With the help of the Scatter add-on, I set up three-particle systems – one type of grass (Scatter preset “Cluster Grass MS”), another kind of grass with the same preset, and small rocks with preset “Simple M.”
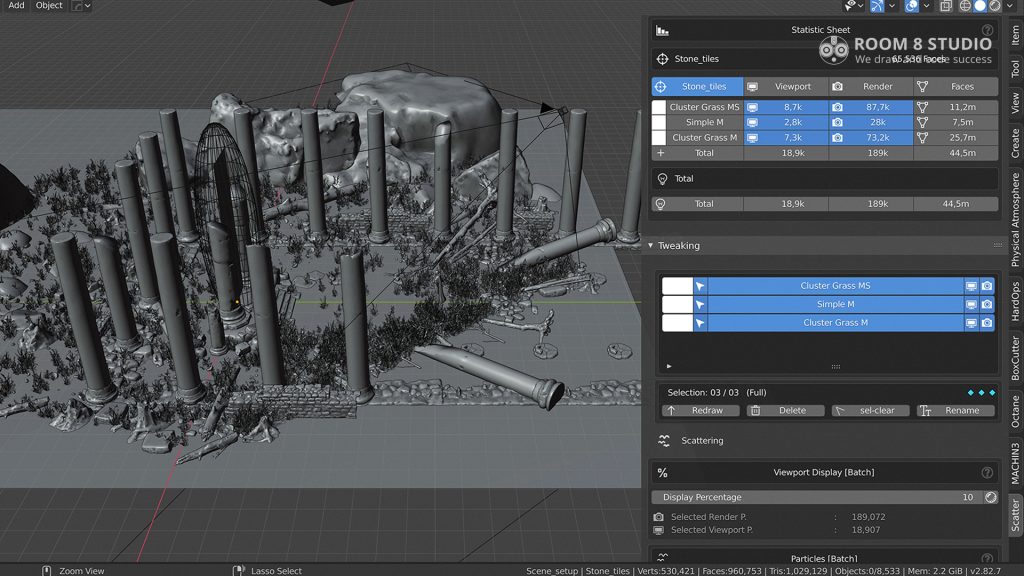
The texture controls the density of all scattered assets I drew on the base plane in Weight Paint mode.
OctaneRender
Blender has a built-in Cycles renderer, and there are lots of great artworks rendered with Cycles. As for me, I found Cycles a little bit slower and less realistic than OctaneRender, so most of the time, I use Eevee and Octane Render in Blender.
Octane Render is commercial software and typically requires a paid license to work, but OTOY made a free version of Octane for Blender. The free tier has some limitations compared to the paid version, but I believe that these limitations are not critical for concept art creation.
Texturing
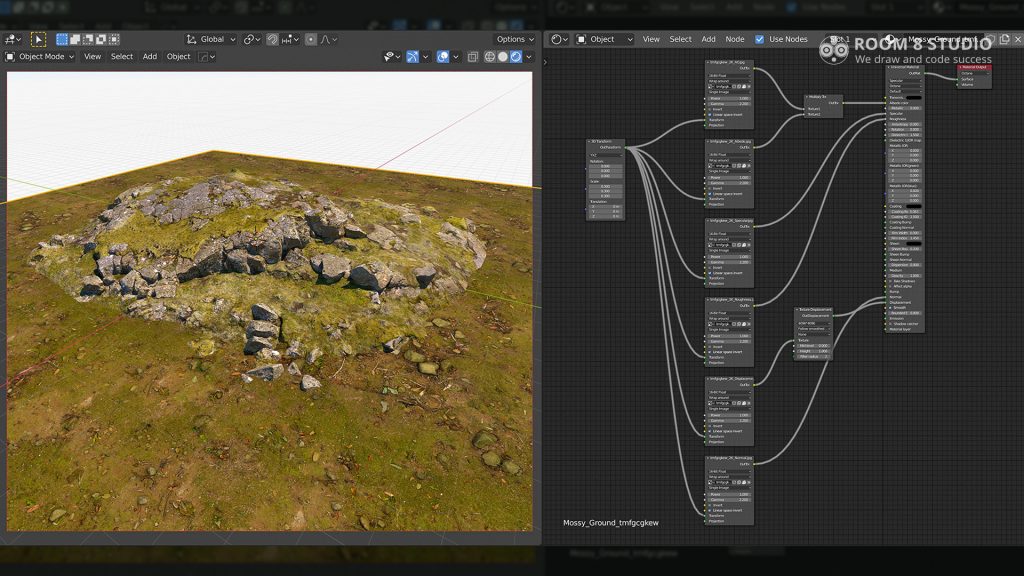
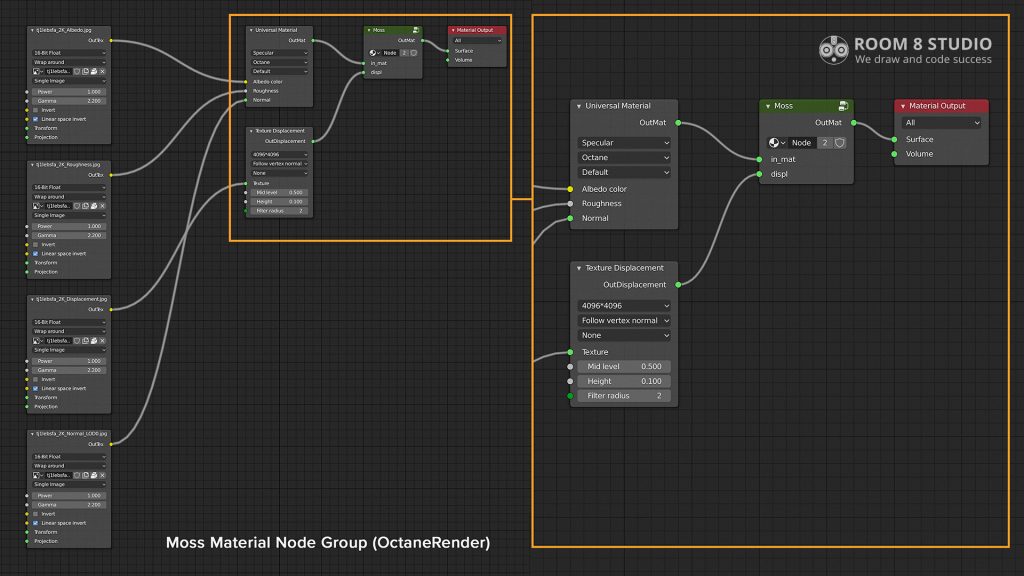
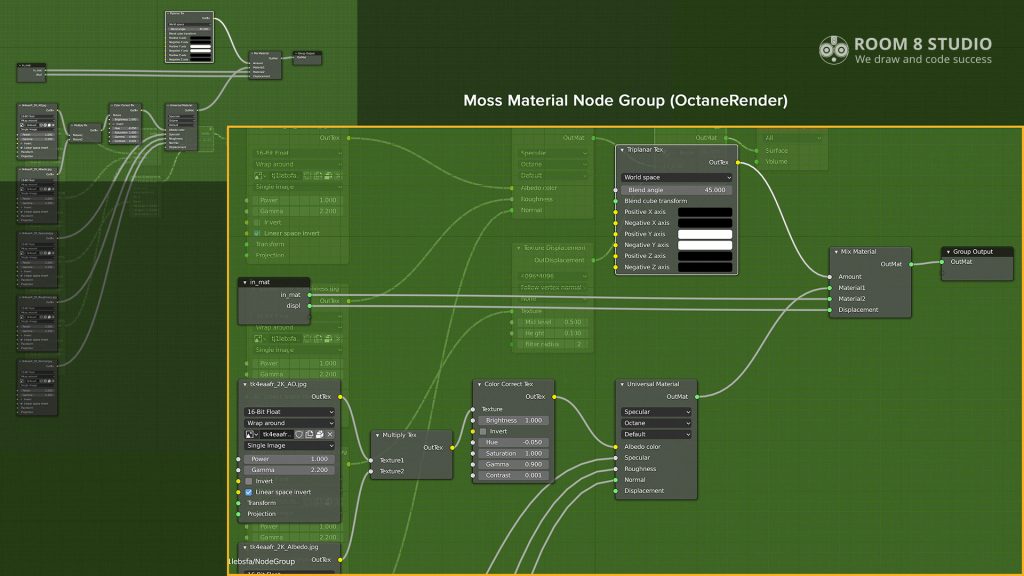
I didn’t make any substantial changes for Megascans assets textures. To quickly add moss to assets, I set up a node group, “Moss,” which I added to materials where needed. Inside this node is a simple shader setup, which mixes moss material from Megascans with another material using a triplanar texture node as a mask. It allows adding moss only on surfaces facing upward.
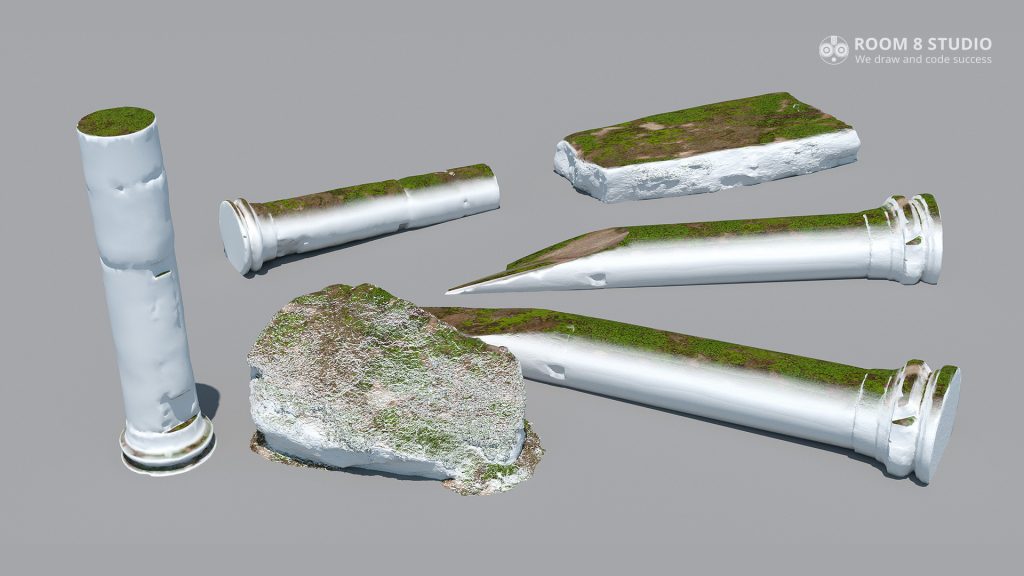
For the floor tiles, I used the 3D surface “Cracked Stone Floor” from Megascans. In the beginning, I also added water puddles in the center of the floor, but it didn’t work, so I painted it over later.
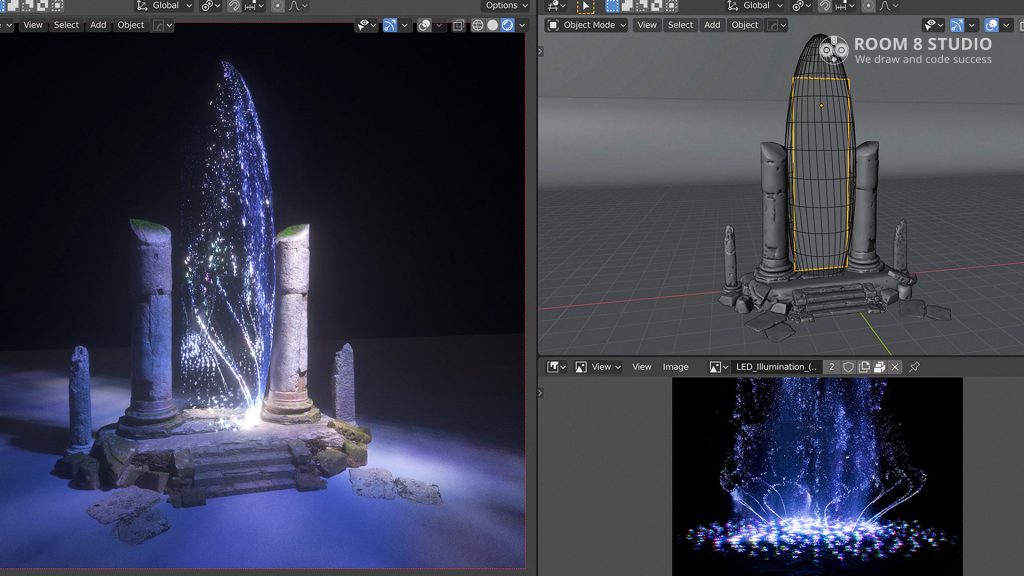
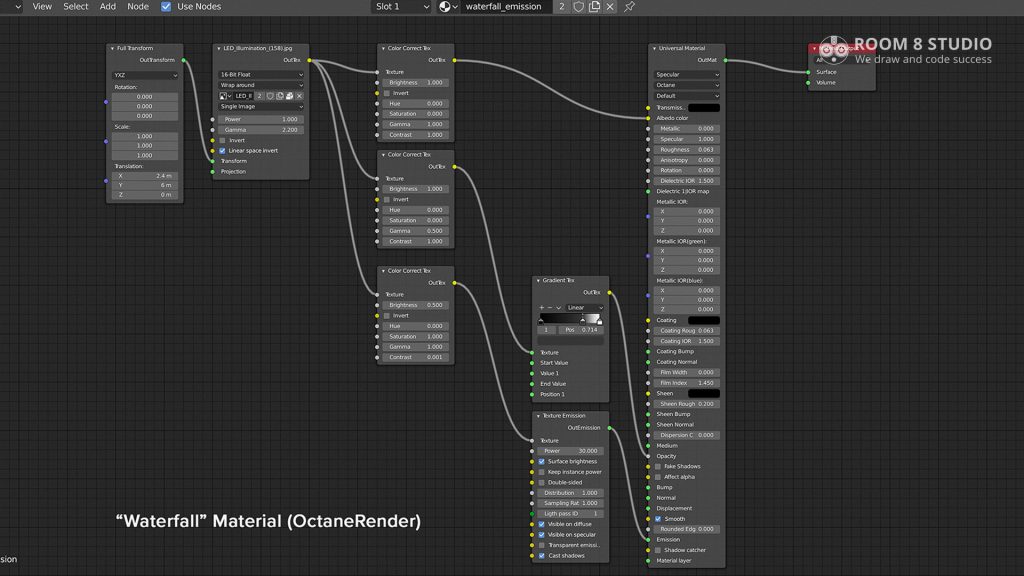
To make the “portal” more compelling, I added some “magical waterfall” to show that something strange was happening. It’s two pieces of simple geometry, a plane and a sphere. They share the same material created with a texture from the LED Illumination pack from Photobash.org. The texture is used for Albedo, Opacity, and Emission inputs of Universal Material.
One side note about managing GPU memory usage. Windows 10, at the moment, doesn’t allow you to use all available GPU memory in CUDA applications (OctaneRender is one of them). So, even with 2K textures, I quickly ran out of available GPU memory, and the solution here was the use of Octane Out of Core. This feature will use part of RAM as part of GPU memory, so you can use more geometry and textures than GPU memory size allows you. The tradeoff here is speed and stability.
Lighting
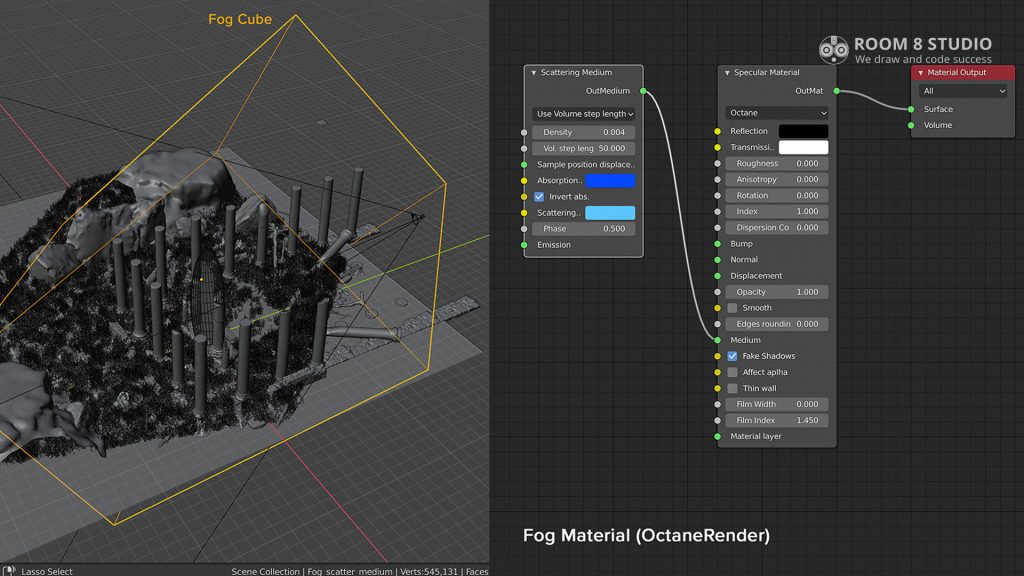
Lighting in this scene plays a huge role. It creates an atmosphere and helps to make a focal point. At the beginning of the project, I tried to light a scene with a built-in Octane Planetary Environment, and it didn’t work for me. So I dived into Octane tutorials, and Julien Gauthier’s Octane Tutorials helped me. After experimenting with lighting, I used an image projector technique (so-called Gobo lighting).
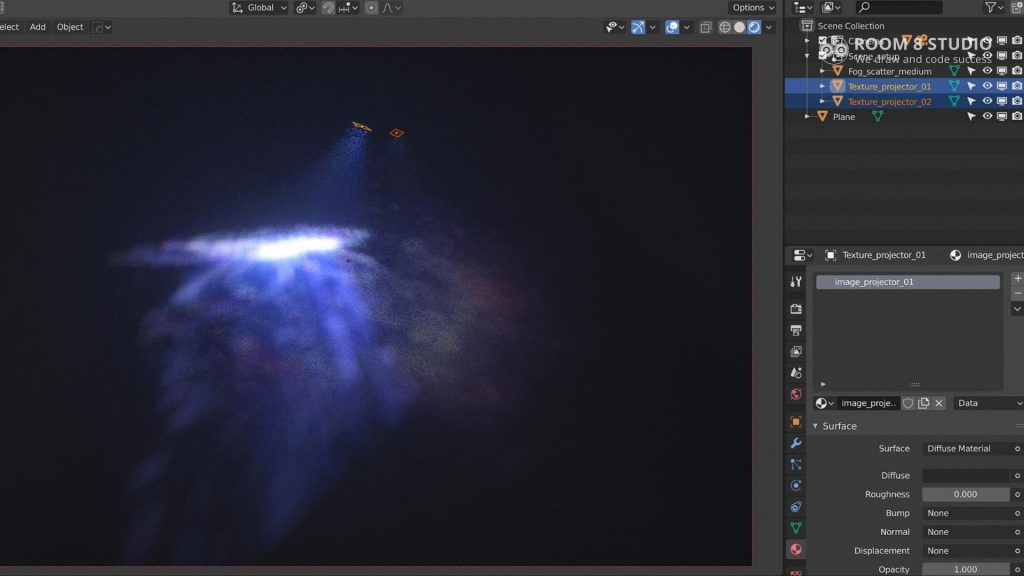
The image projector here is a simple polygon plane with assigned material. It casts the texture onto surfaces like a real-world projector. The scale of the plain controls the size and sharpness of the projected image.

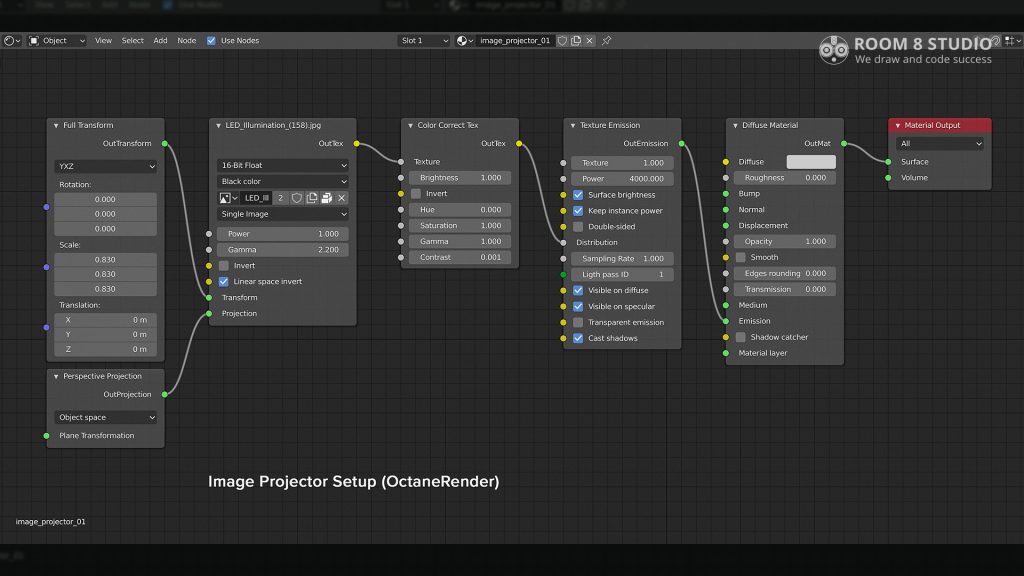
The scene is lit with two image projectors. The main projector creates a spotlight for the central part of the image, and the second one creates ambient lighting.
Another half of the lighting setup here is fog. It instantly adds mood and atmosphere to your scene at the cost of increased render time. It’s a scattering medium plugged in specular material assigned to a cube. One trick here is that the camera should be outside the cube; otherwise, it won’t work.
Photoshop
I rendered an image in 4K resolution for painting over in Photoshop. Usually, I generate a few renders passes to compose it later in Photoshop, but I used only one beauty pass for this project.
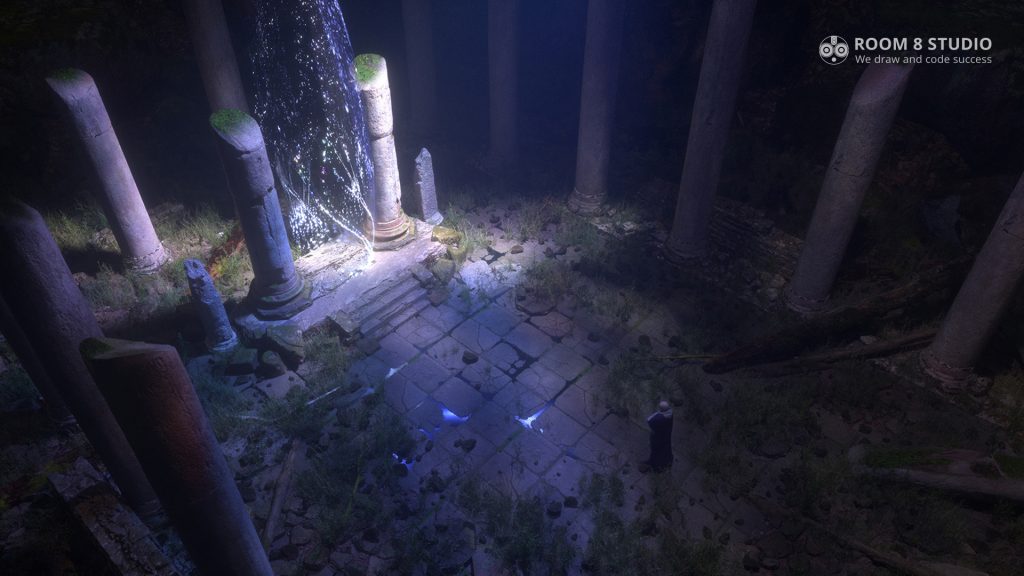
Since I wasn’t entirely happy with the colors of the rendered image, I played with color balance and vibrance filters. Also, I cropped the picture a little bit to enlarge the central part of the location.
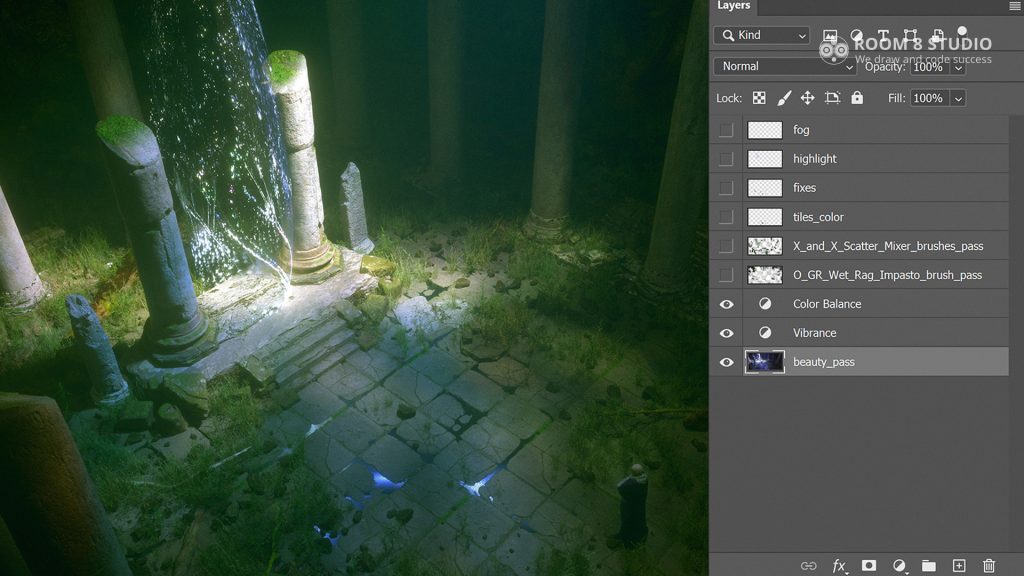
For painting the image over, I used Richard Wright’s brushes. There are two layers of overpainting:
The first layer is painted over with the “O GR Wet Rag Impasto” brush to remove “perfectness” from 3D render (perfectly straight lines, photorealistic textures, etc.) and to create painterly texture.

The second layer is on top of the first pass. It’s a mixer brush pass with “X” and “X Scatter” brushes. It gives more variety to surfaces and makes them look more complex.
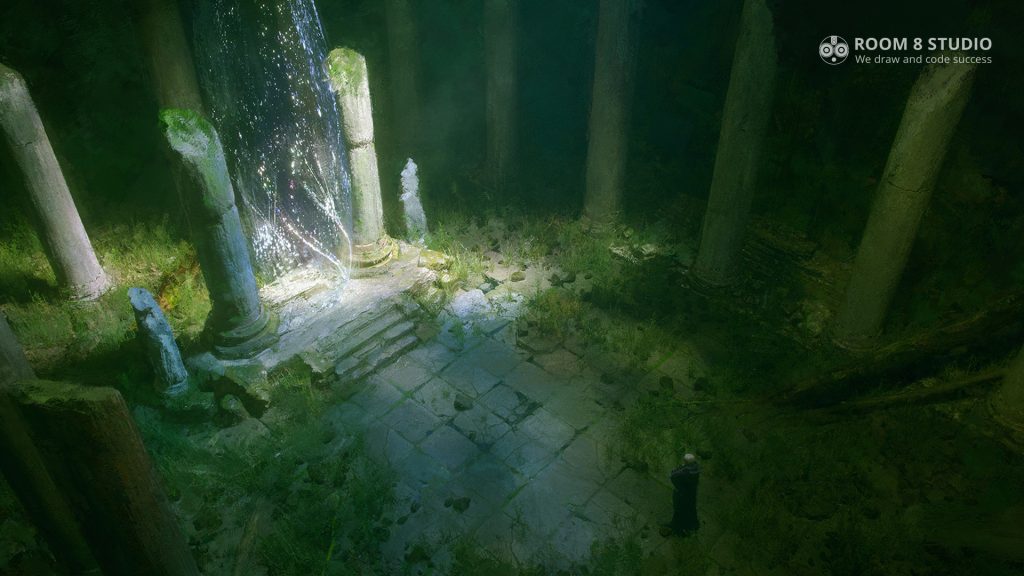
After painting over with brushes, I fixed a few areas here and there (harsh light reflection from the water on the floor and top parts of columns), then I added highlight on the “waterfall” with a soft brush and a little fog patch in the ray of light.
The next step was post-processing, and here I used a so-called non-destructive approach to add or change the number of effects applied to layers. In the beginning, I converted all layers to one bright object and applied smart filters (Unsharp Mask, Camera Raw Filter, Lens Correction). This setup allowed me to remove or change smart filters at any time without affecting the original layer.
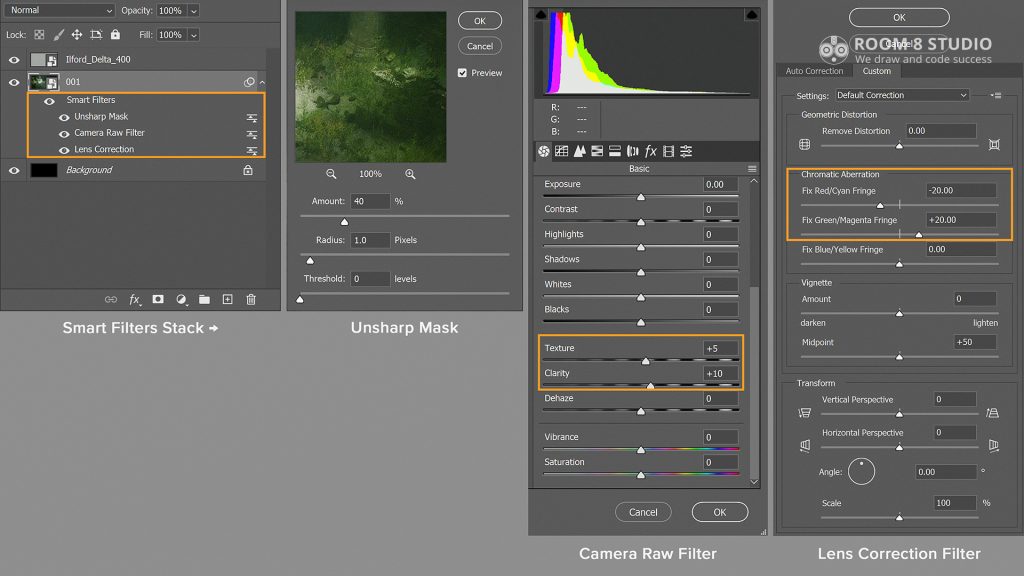
- Unsharp Mask adds sharpness
- Camera Raw Filter – Clarity and Texture increase “micro-contrast” in the image
- Lens Correction adds chromatic aberrations
I added noise to introduce additional texture and some grain for the final touch. In this case, I used a free film scan from Boris Sitnikov, Ilford Delta 400. These free scans are available here (in Russian).
The noise layer has an overlay mode and 50% opacity.
The Biggest Challenges
The biggest challenge on this project for me was the technical side because of the number of used models and textures. I tried to keep everything real-time in Blender’s viewport, so the Scatter add-on was a remarkable finding for me. Also, Megascans Live Link for Octane add-on sped up the entire process of building the location and saved some time.
The entertainment industry in general and the concept art field, in particular, are highly competitive areas, so I think that any activity which helps you develop and hone your skills is essential. I would recommend always looking for new information, watching new tutorials, and learning different workflows, pipelines, and everything that helps increase the quality of your art and make creation more accessible.
And finally, I want to share some Blender tips that I use every day.
Structure – I always put assets in collections to keep the structure tidy and easy to read. The same principle applies to the names of materials. It makes it much easier and faster to navigate through the assets. If you need to hand your file to another artist, there will be fewer questions about what is going on in the scene.
Leftovers – Using the “File > Clean Up > Purge All” command from time to time removes unused data (such as textures, meshes, lights, etc.) from your scene. “Purge All” could dramatically decrease the size of .blend files (in case you have many leftovers there). Alternatively, you can access this feature in the “Orphan Data” tab in the Outliner.
Texture Packing – Before handing the file to another artist, it might be helpful to check the box on “File > External Data > Automatically Pack Into .blend.” This will force Blender to collect and pack all required textures into one working .blend file.
Compression – In most cases, the size of the blend file could be significantly smaller with compression. Enable “Compress File” in Blender preferences (Save & Load tab) to automatically pack files on the fly (Blender uses GZip). Saving the file will take more time.
Thank you for reading, and I hope you found some helpful information in this article!


